How to run POTOS observer nodes#
This section provides a step-by-step guide to running an observer node on your own environment.
Here are three ways to run an observer node, choose the one that best suits your needs:
System requirements#
Running an observer node requires the following system requirements:
Specifications |
Recommended |
Lowest |
|---|---|---|
CPU |
16 cores |
4 cores |
Memory |
64 GB |
8 GB |
Storage |
> 4 TB SSD, 4,000 Mbps |
> 1 TB SSD, 800 Mbps |
Network |
10 Gbps |
10 Mbps |
Storage Expansion Requirements#
To address storage expansion, the requirement is determined by both the block size and transaction volume. Assuming average transaction size of 200 bytes and with each block containing approximately 100 transactions, the storage needed per block stands at 20 KB. With a block interval set at 1 second, this translates to a daily storage requirement of 20 KB multiplied by 24 hours by 3600 seconds, equating to 1.65 GB per day. This calculation underscores the importance of considering both the frequency and size of transactions when planning for storage capacity.
Operation System#
(Recommended) AWS Amazon Linux2, or other linux-based environments in mainstream cloud services provider.
(Recommended) Ubuntu 22.04 LTS in x86_64 or arm64.
CentOS 7/8 in x86_64 ir arm 64.
macOS 13.0 or later in x86_64 or arm64.
Run a observer node manually#
Step 1. Download FISCO BCOS binaries#
Download the FISCO BCOS binaries from the github release.
Step 2. Build an empty node directory#
Create a directory to store the FISCO BCOS binaries and configuration files, and build an empty node directory.
mkdir -p ~/path/to/FISCO BCOS
cd ~/path/to/FISCO BCOS

# Build an empty node directory
bash build_chain.sh -C expand -o nodes/127.0.0.1/node4 -e ./fisco-bcos-bcos

tree ./nodes
./nodes
└─── 127.0.0.1
    ├── fisco-bcos
    ├── node0
    │   ├── conf
    │   ├── config.ini
    │   ├── start.sh
    │   └── stop.sh
    ├── start_all.sh
    └── stop_all.sh
Step 3. Obtain certificate of connection#
To connect to the network, you need to obtain a certificate from the network operator. The certificate is used to authenticate your node and establish a secure connection to the network.
For network operator#
If you are the network operator, you can generate a certificate using the FISCO BCOS command line tool.
cd ~/path/to/FISCO BCOS
bash build_chain.sh -C expand -c nodes/127.0.0.1/node0 -d nodes/ca -o expand_node
tar -czvf expand_node.tar.gz expand_node
This command generates a certificate and saves it to the certs directory in the current working directory.
For user to connect#
If you are a user, you need to obtain a certificate from the network operator. The operator will provide you with a certificate file that you can use to connect to the network.
cp ~/expand_node.tar.gz ~/path/to/FISCO BCOS
cd ~/path/to/FISCO BCOS
tar -xvf expand_node.tar.gz
cp -r ~/path/to/FISCO BCOS/expand_node/conf ~/path/to/FISCO BCOS/nodes/127.0.0.1/node0/
And then, touch nodes.json file in the node directory.
touch ~/path/to/FISCO BCOS/nodes/127.0.0.1/node0/nodes.json

# You can specify the IP address and port of the consensus node in the nodes.json file
echo '{"nodes":["127.0.0.1:30300"]}' > ~/path/to/FISCO BCOS/nodes/127.0.0.1/node0/nodes.json
Step 4. Obtain genesis block#
To sync block from main blockchain, you need to obtain the genesis block from the blockchain operator. The genesis block is the first block in the blockchain and contains the initial state of the network.
For blockchain operator#
Just provide the genesis block file to the user.
cp ~/path/to/FISCO BCOS/nodes/127.0.0.1/node0/config.genesis ~/path/to/FISCO BCOS
For user#
cp ~/config.genesis ~/path/to/FISCO BCOS/nodes/127.0.0.1/node0/
Step 5. Everything is ready?#
After completing the above steps, you should have the following files in the node directory, please check it twice :)
cd ~/path/to/FISCO BCOS/nodes/
tree ./nodes
./nodes
└─── 127.0.0.1
    ├── fisco-bcos
    ├── node0
    │   ├── conf
    │   │   ├── ca.crt
    │   │   ├── cert.cnf
    │   │   ├── node.nodeid
    │   │   ├── node.pem
    │   │   ├── ssl.crt
    │   │   ├── ssl.key
    │   │   └── ssl.nodeid
    │   ├── config.genesis
    │   ├── config.ini
    │   ├── nodes.json
    │   ├── start.sh
    │   └── stop.sh
    ├── start_all.sh
    └── stop_all.sh
Step 6. Start observer node#
Before starting the observer node, you need to ensure that port 30300, 20200 and 8545 are not occupied by other services. If you want to edit the configuration of the observer node, you can edit the config.ini file in the node directory, check more details in the Configure observer node section.
Run the start_all.sh script to start the observer node.
cd ~/path/to/observer/observer_node
# Start observer node
bash start_all.sh
# Observer node pid is 98622
 node0 start successfully pid=98622

ps -ef | grep bcos
501 98622     1   0 10:36下午 ttys019   13:33.97 /path/to/observer/observer_node/node0/../fisco-bcos -c config.ini -g config.genesis
After starting the observer node, it will start to synchronize the block data. You can grep the log file to check the synchronization status.
tail -f node0/log/* | grep Report

# Many logs will be printed, and the following is an example of the log
info|2024-10-15 22:36:31.415281|[CONSENSUS][PBFT][METRIC]^^^^^^^^Report,sealer=2,txs=1,committedIndex=203,consNum=204
Step 7. Using Console to Interact with Observer Node#
The observer node provides a console tool to interact with the observer node. You can use the console tool to query the block information, transaction information, and other information of the observer node.
cd ~/path/to/observer/observer_node/console
# Start the console tool
bash start.sh
After starting the console tool, you can use the console tool to interact with the observer node.
=============================================================================================
Welcome to FISCO BCOS console(3.7.0)!
Type 'help' or 'h' for help. Type 'quit' or 'q' to quit console.
=============================================================================================
[group0]: /apps> getSyncStatus
SyncStatusInfo{
    isSyncing='false',
    protocolId='null',
    genesisHash='4c111014f67613a8960d94a9076623857718fc560bd9e958e5dbabeb62f30baa',
    nodeId='7a810fc2eb501f8714e096c87bee8fd7afc7b1539dc22ed18ee18b84842fa96e916d4c2a485afb5c371a404cba714c18ffaedf25514914e5e501a5fde77dce82',
    blockNumber='205',
    latestHash='f61568ad595db09e42f6a90afc880c4dad98556dd776783ce428e17d1d755a25',
    knownHighestNumber='205',
    txPoolSize='null',
    peers=[
        PeersInfo{
            nodeId='3e971195fd767fdb47a9057563ff139e89e29b39a223040bc0d535b090d71cbd4e9e6b60ee18bf2d160519f30922b2a97a97537cf334f353fa72b3247cbc034a',
            genesisHash='4c111014f67613a8960d94a9076623857718fc560bd9e958e5dbabeb62f30baa',
            blockNumber='205',
            latestHash='f61568ad595db09e42f6a90afc880c4dad98556dd776783ce428e17d1d755a25'
        }
    ],
    knownLatestHash='f61568ad595db09e42f6a90afc880c4dad98556dd776783ce428e17d1d755a25'
}
Step 8. Connecting MetaMask to Observer Node#
After the observer node is started, it will start a JSON-RPC service on port 8545. You can connect MetaMask to the observer node by adding a custom RPC.
If you do not have a wallet yet, create an account using MetaMask (choose any Ethereum-compatible account type) here. For more information on MetaMask, please refer here.
To access the observer node network, follow steps below to configure MetaMask:
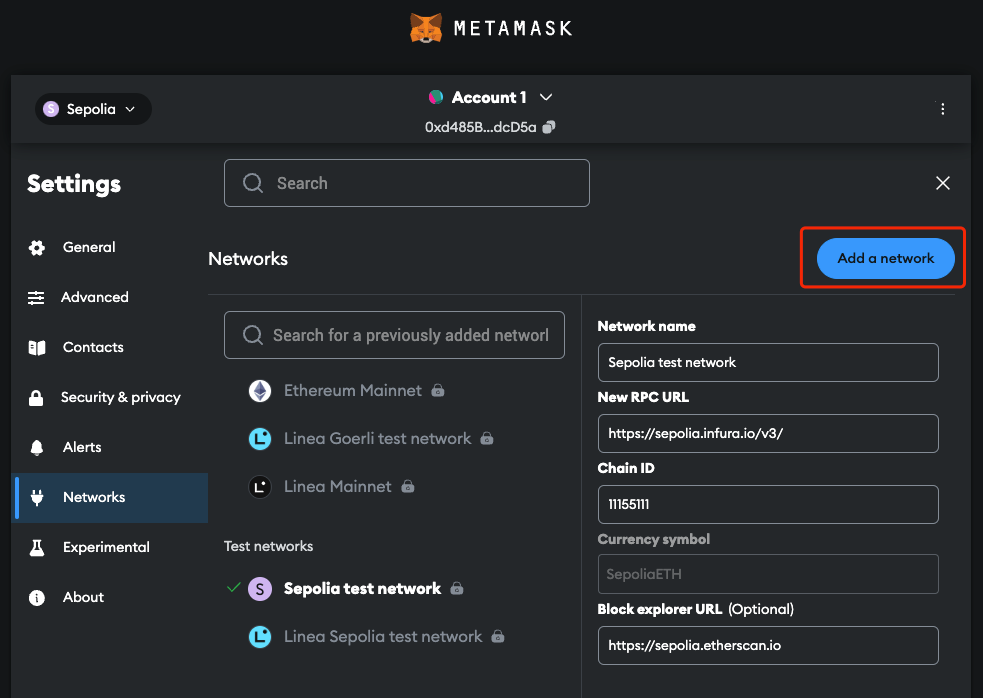
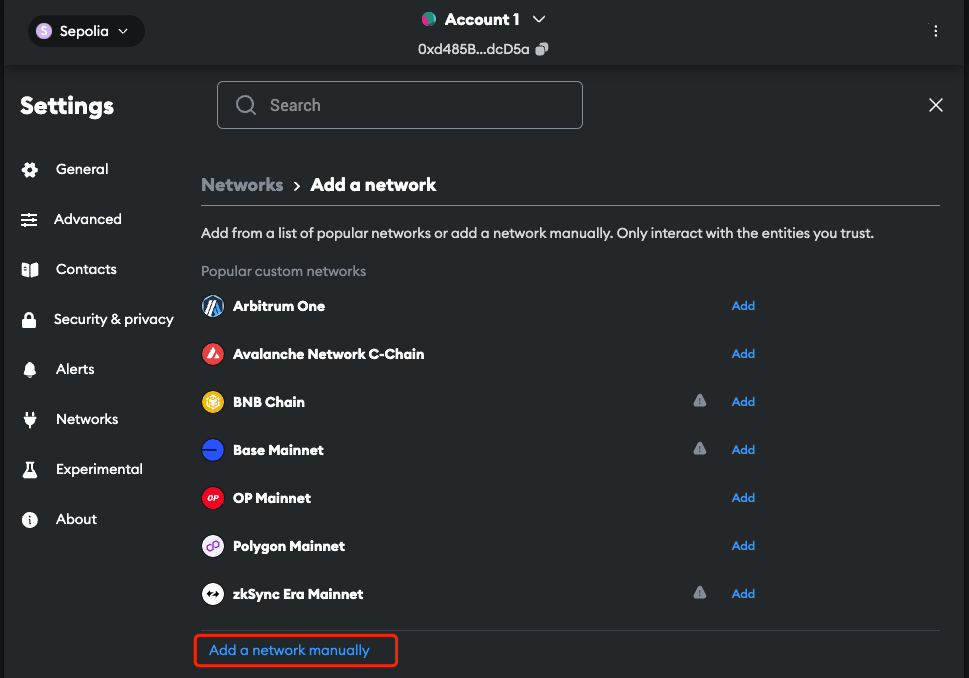
Open the “Network” setting, click “Add a network”:
Click “Add a network manually”:
Fill in required information for the local observer node network and click “Save”.
The default chain ID for FISCO BCOS is
20200and the default RPC URL ishttp://127.0.0.1:8545. TheNetwork nameandCurrency symbolare not required, you can fill in any name you like.
You will see the observer node network added to the list.
Step 9. Stop observer node#
cd ~/path/to/FISCO BCOS/nodes/
bash stop_all.sh
(Optional) Run observer node in Docker#
Comming soon.
Configure observer node#
You can configure the observer node by editing the config.ini file in the node directory. The config.ini file contains the configuration settings for the observer node, such as the network settings, logging settings.
For more details about the configuration settings, see the Configuration of FISCO BCOS.
Network settings#
The network settings in the config.ini file specify the IP address and port of the observer node. The file location is in ~/path/to/observer/observer_node/node0/config.ini.
[p2p] ; p2p network configuration
    listen_ip=0.0.0.0
    listen_port=30300
[rpc] ; FISCO BCOS rpc configuration, used in console
    listen_ip=0.0.0.0
    listen_port=20200
[web3_rpc] ; Web3 standard rpc configuration, used in MetaMask
    enable=true
    listen_ip=0.0.0.0
    listen_port=8545
    thread_count=8
Logging settings#
The logging settings in the config.ini file specify the log level and log file location. The file location is in ~/path/to/FISCO BCOS/nodes/config.ini.
[log]
    enable=true
    ; print the log to std::cout or not, default print to the log files
    enable_console_output = false
    log_path=./log
    ; info debug trace
    level=info
    ; MB
    max_log_file_size=1024
    ; rotate the log every hour
    ;enable_rotate_by_hour=true
    enable_rate_collector=false
Node starting and stopping#
The start.sh and stop.sh scripts in the node directory are used to start and stop the observer node. You can run the start.sh script to start the observer node and the stop.sh script to stop the observer node.
cd ~/path/to/FISCO BCOS/nodes/
# Start observer node
bash start_all.sh
# Stop observer node
bash stop_all.sh